- Follow the steps outlines in Adding HtmlBox to a WebForm so that an HtmlBox control is visible on the Designer.
- To add code using Code Behind double click the Designer to bring up the class representing the WebForm, then enter your code into the Page_Load event.
[Visual Basic, C#] The following code demonstrates setting the BackColor, BorderWidth properties and the AddToolbarItem method. For the purposes of this walkthrough, simply put this code in the Page_Load event for the WebForm.
[C#]
HtmlBox1.BackColor = System.Drawing.Color.Red;
HtmlBox1.BorderWidth = 4;
HtmlBox1.AddToolbarItem(Dart.PowerWEB.TextBox.ToolbarItemType.InsertTable);

[Visual Basic]
HtmlBox1.BackColor = System.Drawing.Color.Red
HtmlBox1.BorderWidth = 4
HtmlBox1.AddToolbarItem(Dart.PowerWEB.TextBox.ToolbarItemType.InsertTable)
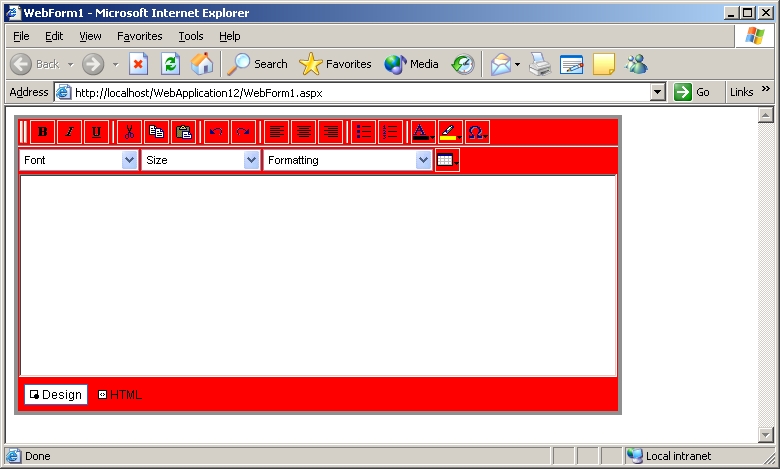
Compile and run the Web application. You should now have a Web page in Internet Explorer that contains an HtmlBox with a red back color, a border width of 4, and a new toolbar item for inserting tables, as shown below.
In This Section
- Creating a New Project
- Describes how to create a new project in VS.NET.
- Adding HtmlBox to a WebForm
- Describes how to add the HtmlBox to a WebForm.
- Designer Support
- Discusses designer support features available when using VS.NET.
- Walkthrough: Creating an Application Using Code-Behind
- Demonstrates how to create a simple HTML editing application in VS.NET using code-behind techniques.
- Walkthrough: Creating an Application Using the Property Builder
- Demonstrates how to create a simple HTML editing application in VS.NET using the Property Builder.
- Deploying Your Project
- Discusses how to deploy your finished project.
Send comments on this topic.
Documentation version 3.2.0.0.
© 2009 Dart Communications. All rights reserved.