The following steps provide a walkthrough to create a project in Visual Studio.NET. Although
To create a project in Visual Studio .NET, use the following steps (the following steps demonstrate using the HtmlBox control):
- Start Visual Studio .NET.
- From the File menu, choose New, and then choose Project.
- From the resulting dialog box, choose either Visual C# Projects or Visual Basic Projects and then choose ASP.NET Web Application. Specify a name and a location for the project, and then click OK.
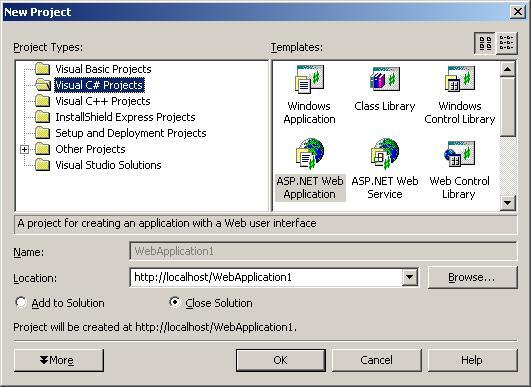
- After these steps have been completed, the project is created.
In This Section
- Creating a New Project
- Describes how to create a new project in VS.NET.
- Adding HtmlBox to a WebForm
- Describes how to add the HtmlBox to a WebForm.
- Designer Support
- Discusses designer support features available when using VS.NET.
- Walkthrough: Creating an Application Using Code-Behind
- Demonstrates how to create a simple HTML editing application in VS.NET using code-behind techniques.
- Walkthrough: Creating an Application Using the Property Builder
- Demonstrates how to create a simple HTML editing application in VS.NET using the Property Builder.
- Deploying Your Project
- Discusses how to deploy your finished project.
Send comments on this topic.
Documentation version 3.2.0.0.
© 2009 Dart Communications. All rights reserved.